Source Measure Unit: Python Programming Guide

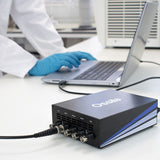
The Ossila Source Measure Unit can be controlled directly over USB or Ethernet using various commands. These can be sent as strings, enabling the use of a large variety of programming languages, including Python, MATLAB, LabVIEW, Java, and C/C++.
This guide provides a basic tutorial for controlling the Source Measure Unit using the Python programming language, along with example scripts for a few basic measurements. The commands that can be used with the Source Measure Unit are detailed in the Programming Documentation.
Please note, this guide assumes a basic level of Python programming knowledge and is not a Python programming tutorial. If you want to learn Python there are many excellent tutorials available online.
Source Measure Unit

Getting Started
Before you can begin controlling your source measure unit, you will need the following:
- Python 3.6 or newer
- Xtralien Python package - Source Measure Unit commands and controls
- pySerial - USB and serial connection handling (not needed for network connections)
- NumPy - Array computing and mathematics (used in the example scripts on this page)
The Xtralien, pySerial, and NumPy packages can be downloaded and installed from the Python Package Index via pip. Some other packages that are useful for scientific programming include:
- SciPy - Scientific and technical computing
- Matplotlib - Data plotting and figure creation
- pandas - Data structure and analysis toolkit
Python Package: Xtralien
Named after the first iteration of the Source Measure Unit, the Xtralien Python Package allows the Source Measure Unit to be controlled Pythonically using dot notation. As an example, to perform a oneshot measurement with SMU 1, you can use:
measurement = xtralien.Device(address).smu1.oneshot(set_voltage)The package converts array and matrix returns into NumPy arrays, and IP addresses, MAC addresses, and versions into strings.
For a complete list of commands that can be used, please see the Programming documentation.
The Device Class
The Device class creates and holds the Source Measure Unit object. When creating a Device object, you give it the COM (USB) or IP (Ethernet) address of Source Measure Unit you want to connect to. For COM addresses you can optionally supply a timeout for the connection using the keyword argument serial_timeout, which is 0.1 s by default. For IP addresses you will also need to supply a port number using the port keyword argument. The port is typically 8888.
# Create a Device object for a USB connection
device = xtralien.Device('COM5')
# Create a Device object for a network connection
device = xtralien.Device('192.168.0.20', port=8888)
You can then control the connected Source Measure Unit using dot notation. For example:
measurement = device.smu1.oneshot(set_voltage)Commands sent in this way assume that a value will be returned, and the code will wait until one is received. For commands that do not return a value, this will cause the code to hang. To resolve this, you simply need to include the keyword argument response=0 in the command call. For example, when enabling Vsense 2, you would use:
device.vsense2.set.enabled(True, response=0)When you are finished using the Source Measure Unit, you should close the connection using the close function:
device.close()If this is not done, you will need to reset the unit before you can connect to it again. Alternatively, you can use the with built-in statement to connect to the device, which will automatically handle closing the connection when you are finished:
with xtralien.Device('COM7') as device:Controlling SMU and Vsense Channels
To perform measurements with the Source Measure Unit you will need to control the SMU and Vsense channels. The SMU channels are used to output controlled voltages and measure this output and the current of the connected circuit. The Vsense channels are used to measure external voltages.
There are 2 ways you can control these channels with the Xtralien Python library. The first is using dot notation as shown in the previous section. Alternatively, you can control them using dictionary notation, with each of the channels acting as a key. For example, to perform a oneshot measurement with SMU 1 using dictionary notation you would write:
measurement = device['smu1'].oneshot(set_voltage)With this method you can have the channels as variables, allowing you to reuse or avoid repeating code for different channels by changing a single variable. For example, if you wanted to set the sampling rate and enable all SMU and Vsense channels you can use:
for channel in ['smu1', 'smu2', 'vsense1', 'vsense2']:
device[channel].set.osr(osr, response=0)
device[channel].set.enabled(True, response=0)
Example Scripts
This section contains examples of how you can perform a few different measurements using the Xtralien Python library. All these examples control a Source Measure Unit connected to the computer using USB.
Current-Voltage Sweep
This example performs a simple current-voltage sweep using a single SMU channel.
from decimal import Decimal
import time

import xtralien

com_no = 12  # USB COM port number of the connected Source Measure Unit
channel = 'smu1'  # SMU channel to use
i_range = 1  # Current range to use, see manual for details

# Parameters are defined using the Decimal class to avoid floating point errors
start_v = Decimal('0')  # Sweep start voltage in volts
end_v = Decimal('2.5')  # Sweep end voltage in volts
inc_v = Decimal('0.05')  # Sweep voltage increment in volts

# Connect to the Source Measure Unit using USB
with xtralien.Device(f'COM{com_no}') as SMU:
    # Set the current range for SMU 1
    SMU[channel].set.range(i_range, response=0)
    time.sleep(0.05)
    # Turn on SMU 1
    SMU[channel].set.enabled(True, response=0)
    time.sleep(0.05)

    #Initialise the set voltage
    set_v = start_v
    # Loop through the voltages to measure
    while set_v <= end_v:
        # Set voltage, measure voltage and current
        voltage, current = SMU[channel].oneshot(set_v)[0]

        # Print measured voltage and current
        print(f'V: {voltage} V; I: {current} A')

        # Increment the set voltage
        set_v += inc_v

    # Reset output voltage and turn off SMU 1
    SMU[channel].set.voltage(0, response=0)
    time.sleep(0.1)
    SMU[channel].set.enabled(False, response=0)
FET Measurement
This example shows a typical FET measurement. Here a voltage sweep is performed using SMU 1 whilst SMU 2 is held at a static voltage, measuring the voltage and current of both SMU channels at each point. After a voltage sweep on SMU 1 has been completed, the output voltage of SMU 2 is incremented, and another voltage sweep using SMU 1 is performed. This is repeated until the voltage list for SMU 2 is exhausted.
import time

import numpy as np
import xtralien

com_no = 12  # USB address of the connected Source Measure Unit
i_range = 1  # Current range to use, see manual for details
osr = 6  # Sampling rate, see manual for details

smu1_v_min = -10  # SMU 1 minimum voltage
smu1_v_max = 10  # SMU 1 maximum voltage
smu1_v_inc = 1  # SMU 1 voltage increment
# Create a list of voltages for SMU 1 to sweep
smu1_v_list = np.arange(smu1_v_min, smu1_v_max + smu1_v_inc, smu1_v_inc)

smu2_v_min = -10  # SMU 2 minimum voltage
smu2_v_max = 10  # SMU 2 maximum voltage
smu2_v_inc = 1  # SMU 2 voltage increment
# Create a list of voltages for SMU 2 to sweep
smu2_v_list = np.arange(smu2_v_min, smu2_v_max + smu2_v_inc, smu2_v_inc)

with xtralien.Device(f'COM{com_no}') as SMU:
    # Initialise the SMU channels and turn them on
    for smu_no in ['smu1', 'smu2']:
        # Set the current range
        SMU[smu_no].set.range(i_range, response=0)
        time.sleep(0.05)
        # Set the OSR
        SMU[smu_no].set.osr(osr, response=0)
        time.sleep(0.05)
        # Turn on the SMU channel
        SMU[smu_no].set.enabled(True, response=0)
        time.sleep(0.05)

    print(f'{"SMU1 V":<15}{"SMU1 I":<15}{"SMU2 V":<15}{"SMU2 I":<15}')

    # Loop through the SMU 2 voltage list
    for smu2_v_set in smu2_v_list:
        # Set SMU 2 output voltage
        SMU['smu2'].set.voltage(smu2_v_set, response=0)
        time.sleep(0.05)

        # Loop through the SMU 1 voltage list
        for smu1_v_set in smu1_v_list:
            # Set SMU1  output voltage
            SMU['smu1'].set.voltage(smu1_v_set, response=0)
            time.sleep(0.05)

            # Measure SMU 1 and SMU 2
            smu1_v, smu1_i = SMU['smu1'].measure()[0]
            smu2_v, smu2_i = SMU['smu2'].measure()[0]

            # Print the measured data
            print(f'{smu1_v:<15}{smu1_i:<15}{smu2_v:<15}{smu2_i:<15}')

    # Turn off the SMU channels and set output to 0 V
    for smu_no in ['smu1', 'smu2']:
        SMU[smu_no].set.voltage(0, response=0)
        time.sleep(0.05)
        SMU[smu_no].set.enabled(False, response=0)
        time.sleep(0.05)
Sheet Resistance
This example shows how the Vsense channels can be used through a simple sheet resistance measurement. Please note that a hardware modification is required to use the X200 as a sheet resistance measurement system. Please contact us for details.
from decimal import Decimal
import time

import numpy as np
import xtralien

com_no = 3  # USB COM port number of the connected Source Measure Unit
smu_channel = 'smu1'  # SMU channel to use
vsense_channel = 'vsense1'  # Vsense channel to use
i_range = 1  # Current range to use, see manual for details
osr = 6  # Sampling rate, see manual for details

# Parameters are defined using the Decimal class to avoid floating point errors
required_current = Decimal('0.05')  # Current to output in Amps
# Step size for output voltage in volts when searching for output current
output_voltage_step = Decimal('0.1')
max_voltage = 10  # Maximum output voltage in volts
geometric_correction = 1  # Geometric correction factor for sample
# See www.ossila.com/pages/sheet-resistance-theory for full details

# Initialise the current and set_voltage variables
current = 0
set_voltage = 0

with xtralien.Device(f'COM{com_no}') as SMU:
    # Set the current range and sampling rate for the SMU channel
    SMU[smu_channel].set.range(i_range, response=0)
    time.sleep(0.05)
    SMU[smu_channel].set.osr(osr, response=0)
    time.sleep(0.05)
    # Set the sampling rate for the Vsense channel
    SMU[vsense_channel].set.osr(osr, response=0)
    time.sleep(0.05)

    # Turn on SMU 1 and Vsense 1
    SMU[smu_channel].set.voltage(set_voltage, response=0)
    time.sleep(0.05)
    SMU[smu_channel].set.enabled(True, response=0)
    time.sleep(0.05)
    SMU[vsense_channel].set.enabled(True, response=0)
    time.sleep(0.05)

    # Measure the current and voltage offset
    i_offset = np.mean(SMU[smu_channel].measurei(10))
    v_offset = np.mean(SMU[vsense_channel].measure(10)[0])

    # Loop until the generated current reaches the required current or until
    # the output voltage exceeds the maximum voltage
    while set_voltage <= max_voltage and current < required_current:
        # Increment the output voltage
        set_voltage += output_voltage_step

        # Set a new output voltage and measure it and the current
        output_v, current = SMU[smu_channel].oneshot(set_voltage)[0]
        # Correct the current to account for the measured offset
        correct_current = current - i_offset

        # Print the output voltage and generated current
        print(f'Output voltage: {output_v} V; Current: {correct_current} A')

    # If the output voltage did not exceed the maximum current perform a
    # sheet resistance measurement
    if not set_voltage > max_voltage:
        # Measure the voltage at the Vsense channel
        voltage = SMU[vsense_channel].measure()[0]
        # Correct the voltage to account for the measured offset
        correct_voltage = voltage - v_offset

        # Print the measured current and voltage
        print(f'Current: {correct_current} A; Voltage: {correct_voltage} V; ')

        # Calculate the sheet resistance
        sheet_resistance = geometric_correction * (
            (np.pi / np.log(2)) * (correct_voltage / correct_current))

        # Print the sheet resistance
        print(f'Sheet resistance: {sheet_resistance} Ω/square')

    # Turn off SMU 1 and Vsense 1
    SMU[smu_channel].set.voltage(0, response=0)
    time.sleep(0.05)
    SMU[smu_channel].set.enabled(False, response=0)
    time.sleep(0.05)
    SMU[vsense_channel].set.enabled(False, response=0)
    time.sleep(0.05)
Source Measure Unit
Learn More...
 Source Measure Unit Quickstart Guide
The Ossila Source Measure Unit can be controlled directly over USB or Ethernet using various commands. These can be sent as strings, enabling the use of a large variety of programming languages, including Python, MATLAB, LabVIEW, Java, and C/C++. This guide provides a basic tutorial for controlling the Source Measure Unit using the Python programming language, along with example scripts for a few basic measurements.
Read more... Measuring Solar Cells with a Source Measure Unit
Source measure units are vital pieces of equipment used for many applications, including the measurement of new solar cells.A small-scale test device is usually used to characterize the solar cell efficiency. These devices are too small to generate usable power but allow you to test the design. Exposing the cell to a known amount of light power, using a solar simulator, allows you to calculate the electrical power produced per unit area.
Read more...