How to Assemble the Vertical Laminar Flow Hood
Our laminar flow hoods arrive flat-packed. This gives you the flexibility to set up your unit in either a vertical or a horizontal configuration, and switch between configurations if needed.
Setting up your vertical laminar flow hood involves six key steps:
- Assembling the Filter Panel
- Assembling the Frame
- Attaching the Filter Panel
- Fit the Screens
- Installing the HEPA filter
- Starting the Laminar Flow Hood
Assembling the Filter Panel
The filter panel consists of two main parts:
- The baffle — containing the main electronics board and motor that control the laminar flow hood.
- The plenum — a large hollow structure that will contain the HEPA filter. There is also a filter guard panel that attaches to the plenum.
Start by aligning the threaded studs on the baffle with the holes on the plenum. For the vertical laminar flow hood, arrange these as shown in the diagram below.
Once fitted, fix in place using the nuts provided.


Assembling the Frame
To assemble the main body of the laminar flow hood, you will need:
- 1 x steel tray
- 2 x clear acrylic side panels
- 1 x black back panel
- 14 x M4 screws
- 14 x M4 nuts
- 12 x M4 washers
- 2 x M4 locking washers
Align the steel tray with the acrylic side panels using the slots and holes in the tray and panels. Before securing, ensure the panels are correctly aligned.
The side panels should extend towards the back of the tray, allowing space for the back panel. The three smaller slots should face upwards to align with the filter panel at the top of the hood.
Once the tray and panels are positioned correctly, secure using the M4 screws, nuts and washers provided.


Next, loosely fit M4 screws, bolts, and washers through the holes on the side of the back panel. Slot the back panel into place by lining up the screws with the slots in the acrylic side panels.
When the back panel is fitted, fix all the screws tightly to secure the frame.
Finally, secure the back panel to the metal tray using the final M4 screws, nuts and locking washers.


Attaching the Filter Panel
Loosely fix M4 screws, nuts, and washers along the lower side of the plenum. Push them out so that they are protruding. This will allow you to slot the filter panel onto the frame using the slots in the side panels.
You will need two people to carefully move the filter panel onto the frame. Once the plenum has been placed on the structure, fix it in place by tightening the fasteners.


Fitting the Screens
Once the main structure is assembled, you can fix the protective screen and the display panel to the hood. Use the pilot holes in the plenum to position the screens.
Attach the display panel to the plenum using:
- 2 x M4 6 mm screws
- 2 x M4 domed nuts
Attach the protective acrylic screen using:
- 4 x M4 6 mm screws
- 4 x M4 locking washers (to reduce vibrations)


Installing the HEPA Filter
Slot the HEPA filter into the plenum, ensuring the correct filter orientation. The arrow on the filter should point downwards, in the direction of the air flow.


Align the HEPA filter so that the gasket lies directly below the clamp screws. When this is position correctly, tighten the filter clamp screws into the plenum until the HEPA filter is secure.
Once the HEPA filter is secure, screw the filter access panel in place.


Laminar Flow Hoods
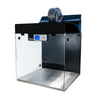
- Vertical/Horizontal Models
- Fully Equipped
- High Purity Air
Available Now! £2,500
Starting the Laminar Flow Hood
The last step is to connect the control board to the display panel.
Use the supplied ethernet cable to connect the baffle to the display panel. This cable can be fed through one of the feedthrough holes in the back or side panels. You can use adhesive cable clips to keep the cable out of the way.


Now, you can plug in your vertical laminar flow hood and switch it on.

Before you use the hood, it is important to:
- Clean your laminar flow hood thoroughly.
- Turn on the fan and UV sterilization light (depending on your sterility requirements) for a period of time, to prepare the environment for use. It is advised to leave the system for at least 20 minutes before first use.
Vertical Laminar Flow Hood

- Eco-Friendly
- Fully Equipped
- High Purity Air
Worldwide Shipping £2,500