Micropipettes: Components and Parts
Micropipettes are indispensable tools in laboratories. These can be used in many applications ranging from thin film deposition by spin coating to cutting-edge molecular biology experiments like PCR (Polymerase Chain Reaction). With micropipettes, you can handle liquids with utmost precision, making them a fundamental part of scientific research and experimentation.
Whether you're working with spin coating, PCR, delicate cell cultures, conducting protein assays, or any other relevant experiments, mastering the your micropipette is essential for accurate and reproducible results. To help you get started, we've created this handy guide clearly labelling the components of your micropipette.

Components:
-
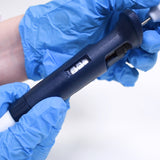
Pipette body: The main housing of the micropipette which houses the internal mechanisms. Do not open the body of the micropipette as you risk damaging internal mechanisms.
-
Plunger: This is the mechanism that allows you to pull up and dispense liquids. Pressing down the plunger will expel air via the tip. Releasing this plunger will then pull up solution into the tip.
-
Tip ejector: Pushing this button will remove of disposable tip, ensuring contamination-free transfers.
-
Volume adjustment ring: This allows precise selection of the desired volume to be aspirated and dispensed. The volume that will be pulled into the tip is shown on the volume display.
-
Volume display: A digital or analog display showing the dispense volume.
- Tip Cone: You can position a disposable tip onto the tip cone. If you are using the correct tip, a disposable tip should fit on simply by pressing the tip onto the micropipette.
Three Plunger Positions:
-
Rest Position: This is the default position of the plunger and piston. The tip is at rest, and no volume is displaced at this position.
-
First Stop: If you place pressure on the plunger, you will feel it stop at a point before it is fully supressed. At this point, upon release, the micropipette will draw up the set volume of liquid. When you are withdrawing liquid into the tip, make sure you only push the plunger to the first stop.
-
Second Stop: If you continue pushing past the first stop, you will fully supress the plunger. This is the point where all the liquid and air in the tip will be expelled. Push through to the second stop when dispensing liquid, to ensure that you remove all the material.
Adjusting Micropipette Volumes
You can change the Micropipettesvolumes using the volume adjustment ring. Increase the measured volume by twisting the ring anti clockwise. Decrease the measured volume by twisting the ring clockwise. You can see the measured volume of the micropipette via the volume display screen.
Never set the measured volume outside of the micropipette stated volume range.
By following these tips, you can effectively use micropipettes to ensure accurate and precise liquid handling, leading to reliable experimental results.
Resources and Support
 Getting Started with a Micropipette
Using your micropipette correctly ensures the most accurate and reproducible measuring and dispensing of solutions.
Read more...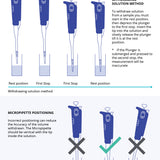 Micropipette: Positioning and Withdrawing
Follow our guide to correctly position and withdraw liquid with your micropipette.
Read more...